Google search console. As a Website Owner or Site Administrator, you need to monitor and maintain your site’s performance daily. For this Google did us a favor!
You heard about Google’s two most important tools: Google Analytics and Google Search Console. These are the free tools of Google for maintaining and gaining valuable insights about your website.
Now, you might be curious about the Search Console and How to set up Google Search Console… So, let’s dig deep down about it.

Table of Contents
What is Google Search Console:
Google Search Console or Search Console is a free tool of Google. It helps in monitoring and maintaining your website’s presence in Google Search Results, and most importantly it doesn’t affect your page’s rank or its performance in Google Search Results.
In simple words, Google Search Console is a Doctor of your Website, which tracks and helps you understand your site’s performance.
Search Console helps you in the following action:
- Helps in analyzing your website’s impression, clicks. CTR and position on Google Search Results.
- Submit individual URL crawling request.
- Submit sitemap.
- Receive email alerts, when issues or errors identified by Google on your site.
How to set up Google Search Console:
First of all, sign in to your Google account. Use a business account for your business site.
Go to Google Search Console.
Click on “Add a property.”
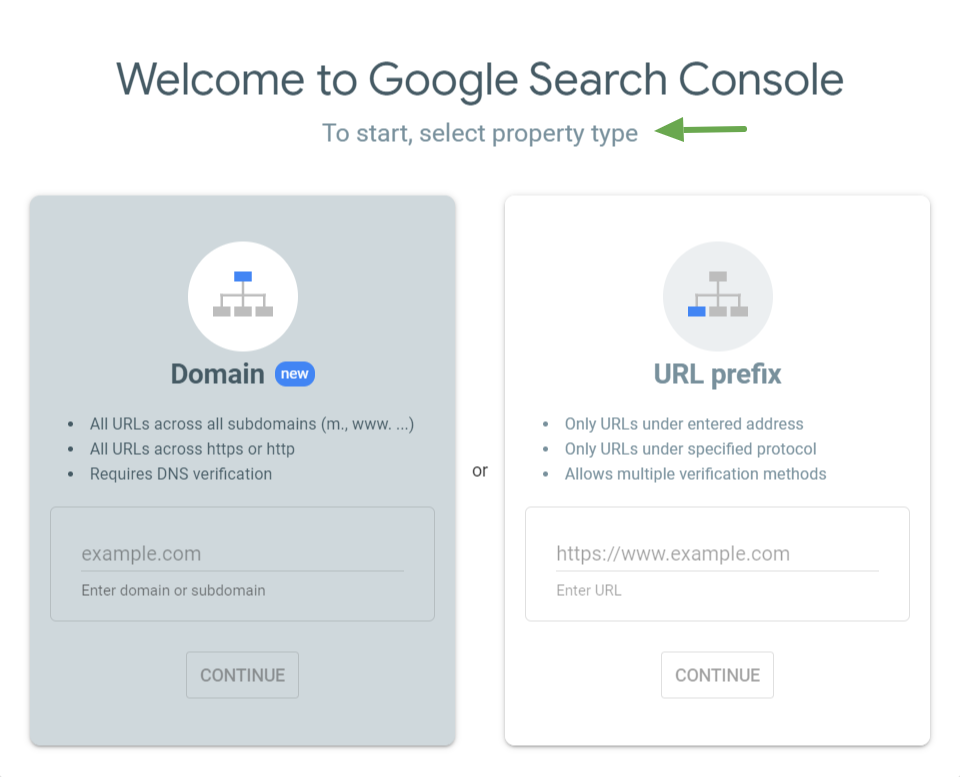
Now you have two options, “Domain” and “URL prefix”.
In the domain section, you need to add the domain name, So it tracks all activities connected to the domain.
If you go with the URL prefix option, you have to add rather it contains https and it’s with or without ‘www’. It’s important to add the right version to collect the right data.
Now it’s time to verify your website.
How to verify Google Search Console:
After adding property, you have to verify that you’re the owner. It is about proving that you actually own the site you’re trying to add.
This process is quite simple. Google provides several verification methods, from which you can choose any one method for verification.
Let’s discuss verification methods in short.
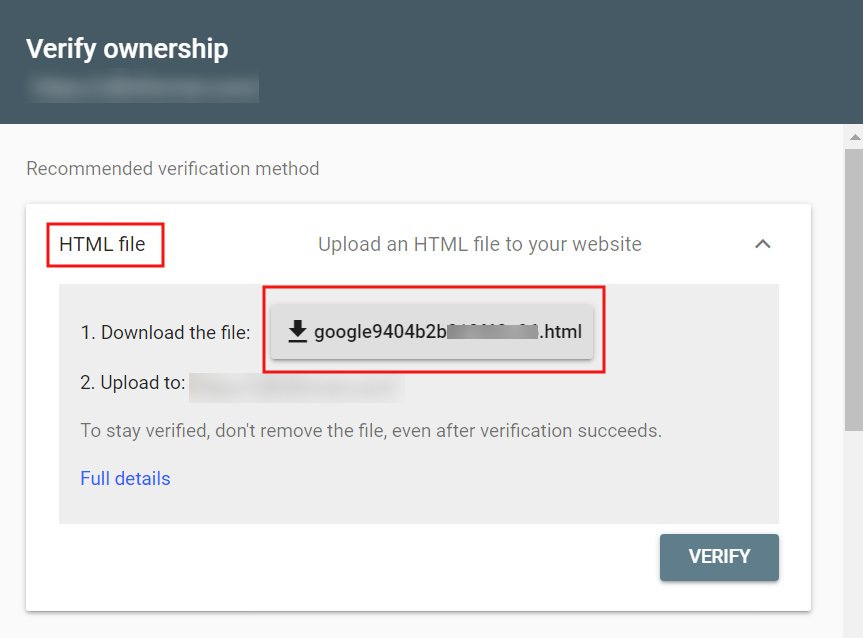
1.HTML File
Download the “HTML file” you can see below the Recommended verification method and upload to your website.
2.HTML Tag
In other verification methods, select HTML Tag. Copy the meta tag and paste in the header tag of your website.

3.DNS TXT Record
In the Alternate method tab select the Domain Name Provider.

4.Google Analytics
You can also verify your property using Google Analytics, If Google Analytics already links with your site.
Just select the Google Analytics section and click on verify.

5.Google Tag Manager
If you’re using Google Tag Manager, then you can also verify your site with the help of that.
Select the Google Tag Manager and click on verify.

After you set up and verify your account, Now let’s look down the features in the Search
Console tool.
How Do You Set Up Google Search Console?
First thing’s first––visit Google Search Console.
- Create an account, or if you have Google Analytics set up on your website (recommended), log in using your Google Analytics credentials.
Next, select a property type by adding your website address to either the domain or URL prefix tab (as seen above).
- You’ll have to verify that you own your site. Preferably, verify ownership using your Google Analytics tracking ID.
- To find your Google Analytics tracking ID, login to your Google Analytics account and navigate to Admin » Property settings » Basic settings» Tracking ID.
- That’s it. It’s as simple as that. Now, the next time you log in to your Google Analytics account, you’ll be able to access Google Search Console via the sidebar as well.
Types of Tab
1.Overview Tab:
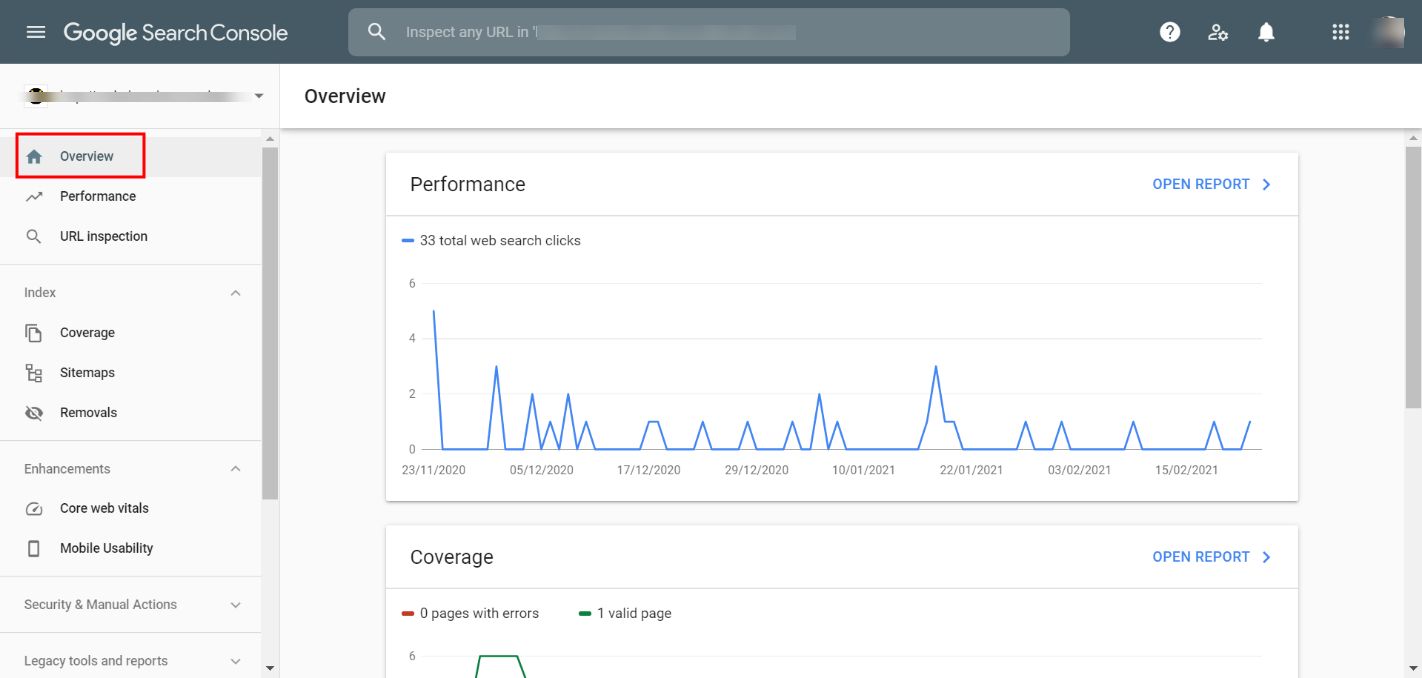
As the name suggests, the Overview tab shows the overview of Performance, Coverage, and Enhancements tabs. Below we discuss every tab in detail.
2.Performance Tab:
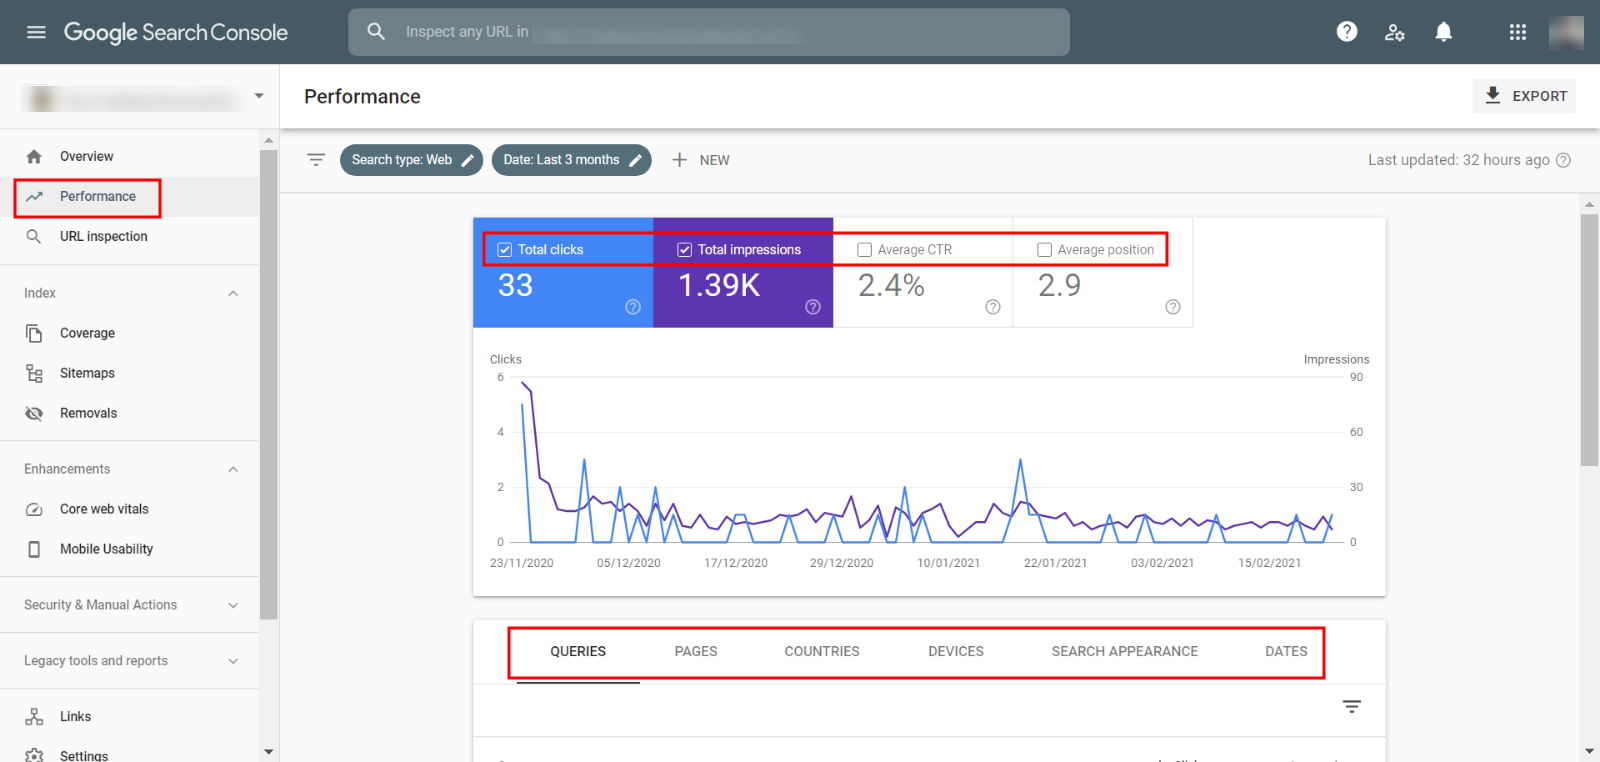
With the help of the Performance tab, you can see which pages or keywords of your website are ranked on Google. The new version shows you the data for up to 16 months, while in the old version you can only see the data of a maximum of the last 90 days. The data is only available from when you set up the account.
Below in the performance tab, there is the list of ‘queries’, ‘pages’, ‘countries’, ‘devices’, and ‘search appearance’.
Above that list you can see four sections, ‘clicks’, ‘impressions’, ‘Average CTR’, ‘Average position’ available with filters Search types and date. Let’s see them in detail.
-
Impression
Each time when a URL appears on Google Result Page, it counts as an impression. It shows how often your specific page is shown in search results.
-
Click
When a user clicks on a link and it takes them away from search results, it counts as a click. It shows how many users click on our link in search results.
It tells us the performance of your page’s meta title and meta description. If more people click, it means it works very well and if a few people click, it means you need improvement.
-
Average CTR
CTR (click-through-rate) is the percentage of people who see your site in search results by people who click on it.
You can improve CTR by rewriting the Meta title and meta description of your page to stand out from the other results and make it more appealing to users.
-
Average Position
It tells the average ranking position of your keyword. Of course, this position is not always right or reliable because every user gets different search results.
-
Search Type
It contains four search types: web, image, videos, news. You can check from which type you get traffic.
With the help of the ‘compare’ tab, you can compare two types of traffic.
-
Date Range
Now the search console offers up to 16 months of data. You can also compare two date ranges with the help of the ‘compare’ tab.
3.URL Inspection:
URL inspection tab inspects your URL and states whether it’s indexed or not. It also shows you some technical terms like last crawl, mobile usability, etc.
Index Courage Tab:

Index courage shows you which pages from your website are indexed on Google. It also lets you know if there are any technical issues, which prevent your pages from getting indexed.
This tab contains four sections: Error, Valid with warning, Valid, Excluded.
Error
This section shows the pages couldn’t be indexed for some reason. These pages won’t appear in search results, this means loss of traffic.
Click, see the details and how to fix that error.
Valid with warning
This shows pages are indexed but there are some issues. So, you have to check if it’s intentional or technical.
Valid
These pages are successfully indexed on Google without any issue.
Excluded
These are the pages intentionally not indexed on Google.
We recommend you to daily monitor this section and fix every error as early as possible you found.
4.Sitemaps:
A sitemap is the road map of the posts on your website. It is most important for Google’s crawlers to crawl your every page and blog post.
In this section, you can add the URL of your sitemap.
5.Enhancement tabs:
Below index courage, there is an Enhancement tab. You’ll get everything you need to improve how your website performs.
6.Removals
The Removals tool enables you to temporarily block pages from Google Search results on sites that you own, see a history of removal requests from both property owners and non-owners, and also to see any URLs on your site that were reported as containing adult content.
7. Page Experience
Page Experience is evaluated per-URL. The assessment, and the report, were developed to help sites create pages that provide a better user experience for their visitors.
Page experience in Google Search is evaluated using the following criteria:
a) Core Web Vitals
Core Web Vitals tests the speed, responsiveness, and stability of the page loading experience for users. The Core Web Vitals report provides a rating of Good, Needs improvement, or Poor to each page. A page must have a Core Web Vitals rating of Good in both CLS and LCP, and Good (or not enough data) in FID in order to qualify for Good page experience status. Note that it takes a few days to import data from the Core Web Vitals report into the Page Experience report, and so the rating for a URL in the Page Experience report can lag slightly behind the URL’s rating in the Core Web Vitals report. URLs without Core Web Vitals cannot appear in the Page Experience report. Open the Core Web Vitals report.
b) Mobile usability
A mobile URL must have no mobile usability errors in order to qualify for Good status on mobile devices in the Page Experience report. URLs without mobile usability data are considered to be Good. Note that mobile usability is reported only for URLs listed as mobile URLs in the report. Open the Mobile Usability report.
c) HTTPS usage
The Page Experience report doesn’t have URL-level HTTPS data for your site, only the overall HTTP/HTTPS ratio for your site. If your site has too high a ratio of HTTP URLs, you will see a warning banner on your site, and the HTTPS section will show Failing.
8.Manual Actions:

If your website gets penalized by Google, the information shows in this section.
Below we see some scenarios when you could get penalties. You perform any illegal practices to rank on Google. Your content seems spam or automatically generated. Using black hat SEO techniques to trick Google.
9.Security issues:
In this tab, you get notifications when your site has security issues.
10.Links:
In this tab of the search console tool, you can see all links on your site. It includes internal links, external links, sites that link to your site, anchor text used for linking to your site. This is very valuable information because links play a major part in ranking.
Uses :
1.Optimize your content with Search Analytics:
See which queries bring users to your site. Analyze your site’s impressions, clicks, and position on Google Search.
2.Get your content on Google
Submit sitemaps and individual URLs for crawling. Review your index coverage to make sure that Google has the freshest view of your site.
3.Get alerted on issues and fix your site
Receive email alerts when Google identifies issues on your site and see which URLs affects these issues and tell Google when you’ve fixed them.
4.Understand how Google Search sees your pages
The URL Inspection tool provides detailed crawl, index, and serving information about your pages, directly from the Google index.
CONCLUSION
Search Console lets you easily monitor and in some cases resolve server errors, site load issues, and security issues like hacking and malware.
You can also use it to ensure any site maintenance or adjustments you make happen smoothly with respect to search performance.


